Gaming monitor refresh rate guide: setup, VRR, and G-Sync explained
CONTENTS
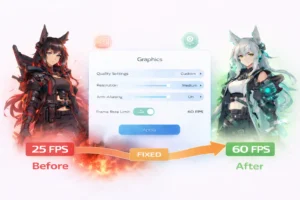
Refresh rate determines how many times per second your monitor updates its image, directly affecting gaming smoothness. Most gamers own high-refresh monitors but never enable those rates in Windows settings, leaving performance on the table. This guide explains refresh rates from 60Hz through 360Hz, shows exactly how to enable them in Windows 11 and GPU software, and clarifies VRR technologies like G-Sync and FreeSync that eliminate screen tearing.
Understanding refresh rates
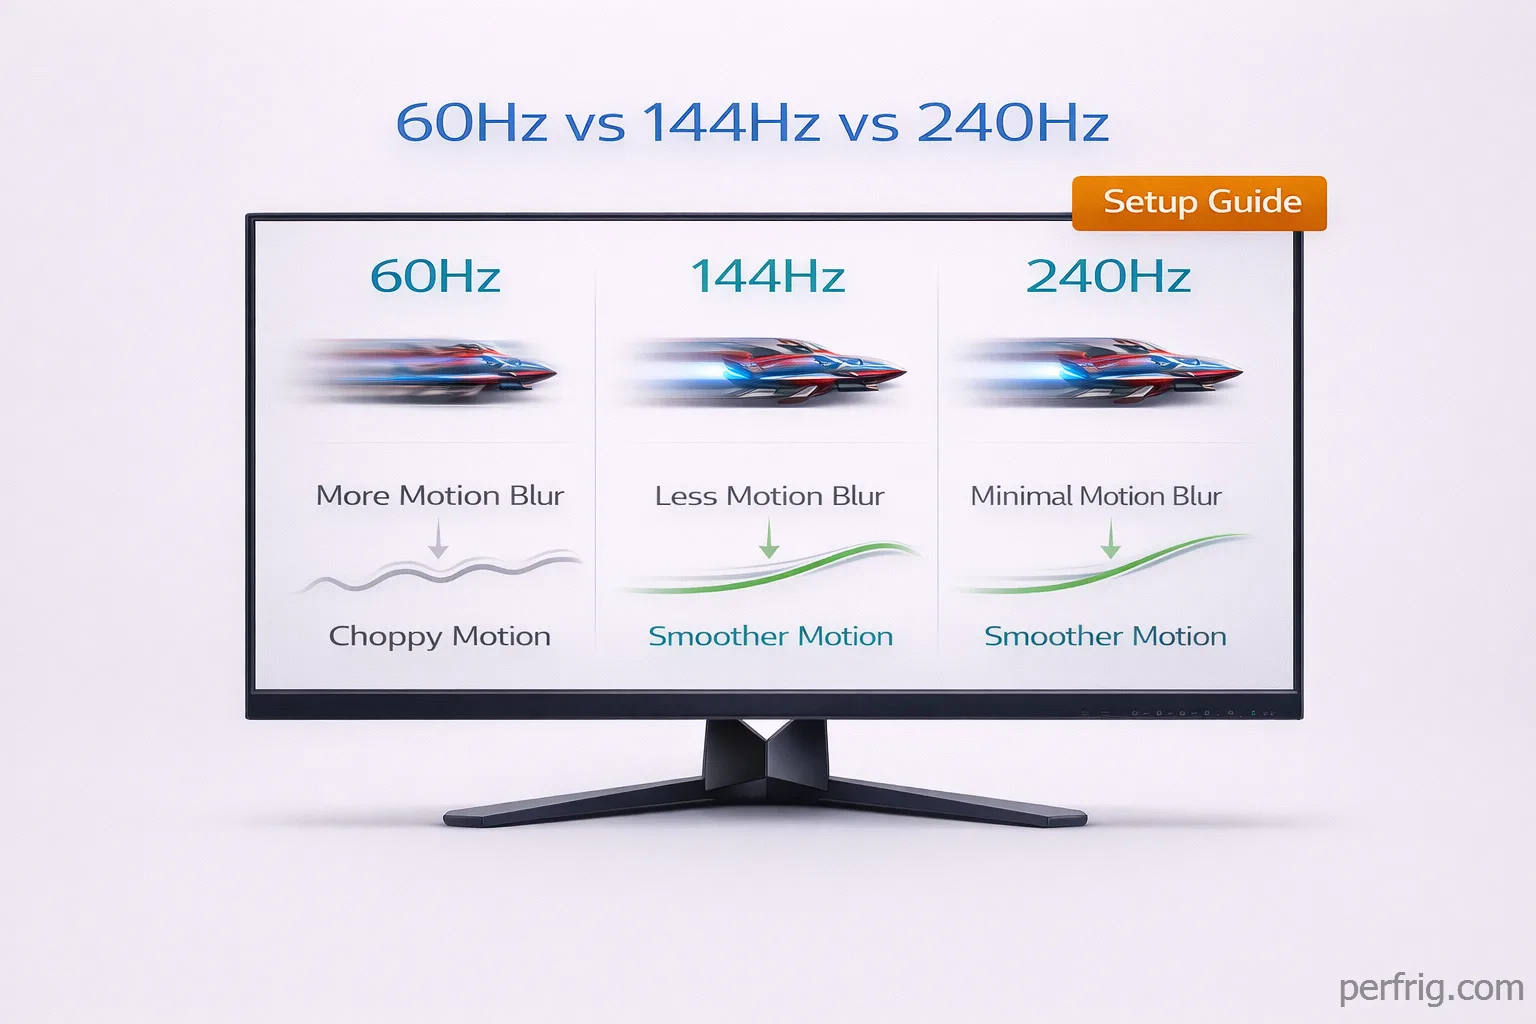
Refresh rate measures how many frames per second your monitor can display. A 60Hz monitor updates 60 times per second, a 144Hz monitor displays up to 144fps, and 360Hz monitors handle 360fps. The practical difference depends on the jump—moving from 60Hz to 144Hz provides dramatically smoother motion most gamers notice immediately. Beyond 240Hz, diminishing returns set in hard.
Here’s the thing: refresh rate only matters if your system maintains matching framerates. A 240Hz monitor displaying 80fps provides no advantage over 144Hz at the same framerate.
Common refresh rate tiers explained
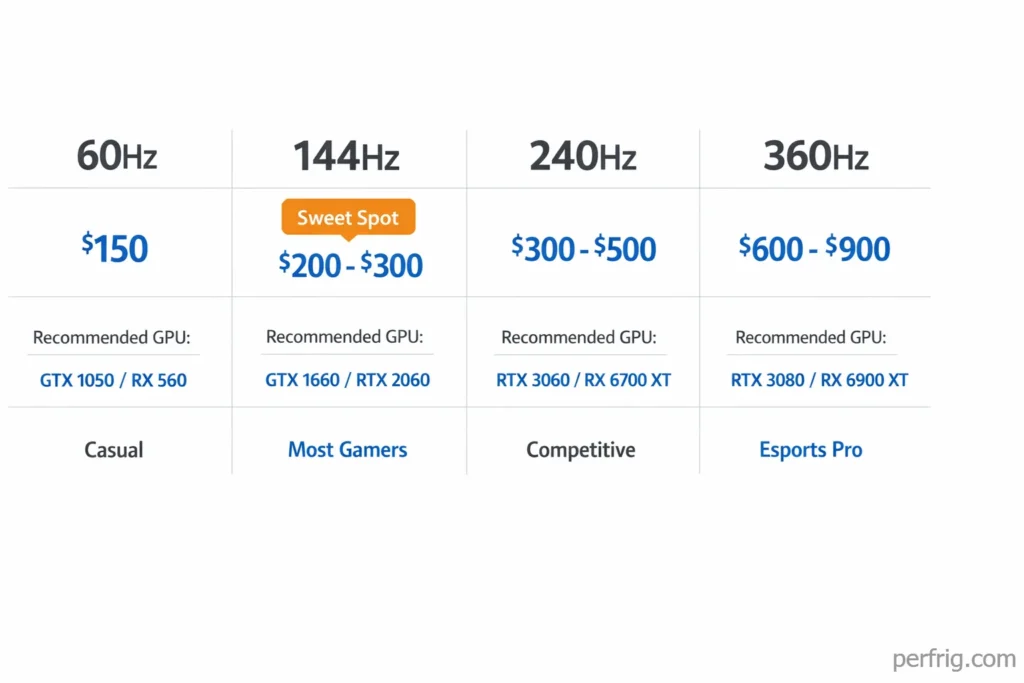
60Hz monitors represent the baseline, perfectly adequate for story-driven titles and casual gaming. 144Hz monitors hit the sweet spot—the jump from 60Hz transforms fast-paced games, making motion tracking dramatically easier. Modern mid-range GPUs maintain 100-144fps in competitive titles, and these monitors start around $200.
240Hz monitors target competitive players. Improvements over 144Hz exist but prove subtle. These $300-500 displays genuinely benefit players maintaining 200+ fps in Valorant, CS2, or Apex Legends. 360Hz monitors serve professional esports players exclusively—at $600-900, minimal improvements over 240Hz only matter in high-stakes competition.
Setting up refresh rate correctly in Windows 11
Windows 11 defaults monitors to 60Hz regardless of their capabilities. You must manually enable higher refresh rates, and the process confuses many users because Windows hides the setting in an unintuitive location.
Open Windows Settings and navigate to System, then Display. Scroll down and click Advanced display settings. Select your gaming monitor from the dropdown if you have multiple displays. Look for “Choose a refresh rate” and select the highest available option—144Hz for a 144Hz monitor, 240Hz for a 240Hz display, and so on.
If your monitor’s maximum refresh rate doesn’t appear in the list, check your cable. HDMI 2.0 supports 1080p at 240Hz and 1440p at 144Hz, but older HDMI versions cap out at 60Hz. DisplayPort 1.4 handles 1080p at 360Hz, 1440p at 240Hz, and 4K at 144Hz. Using the wrong cable physically prevents Windows from offering higher refresh rates.
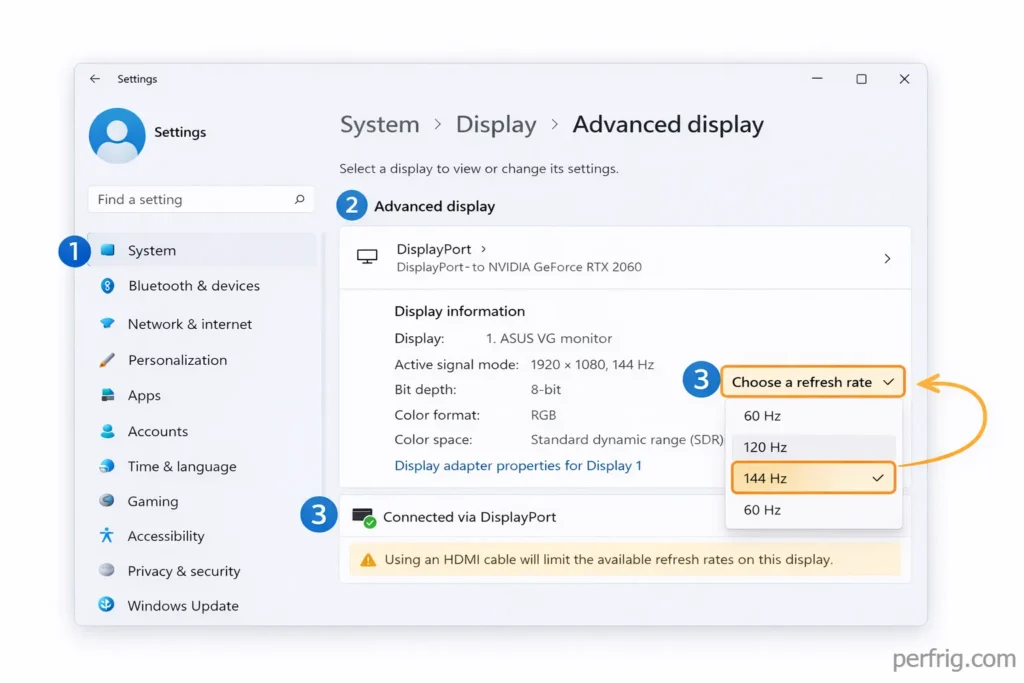
After selecting your desired refresh rate, Windows asks you to confirm the change within 15 seconds. Click Keep changes if the display looks correct. The screen will revert automatically if you don’t confirm, preventing you from getting stuck with a broken display configuration.
Test your new refresh rate immediatly. Move your mouse cursor quickly across the screen—it should appear smoother with less motion blur than before. Open a game and check whether framerates now exceed 60fps. If framerates remain capped at 60fps despite the refresh rate change, you’ve probably got V-Sync enabled somewhere limiting GPU output.
Enabling refresh rate in GPU control panels
Both NVIDIA and AMD provide their own refresh rate controls that sometimes conflict with Windows settings. Checking both locations prevents configuration mismatches that cause problems.
For NVIDIA GPUs, open NVIDIA Control Panel by right-clicking the desktop. Navigate to Display, then Change resolution. Select your monitor on the left side, then choose the highest refresh rate available under the refresh rate dropdown. Click Apply. The setting should match what you configured in Windows—if it doesn’t, Windows settings usually override the control panel, creating confusion.
AMD users should open AMD Software: Adrenalin Edition. Click the gear icon for Settings, then select Display. Choose your monitor and look for Display Specifications. The refresh rate appears here, and you can adjust it if needed. AMD software typically respects Windows settings, but checking prevents issues.
If your monitor’s native refresh rate still doesn’t appear in either location, update your GPU drivers. Outdated drivers sometimes fail to detect a monitor’s full capabilities, arbitrarily limiting available refresh rates. Download the latest drivers directly from NVIDIA or AMD rather than relying on Windows Update, which frequently installs older driver versions.
What is VRR and why it matters
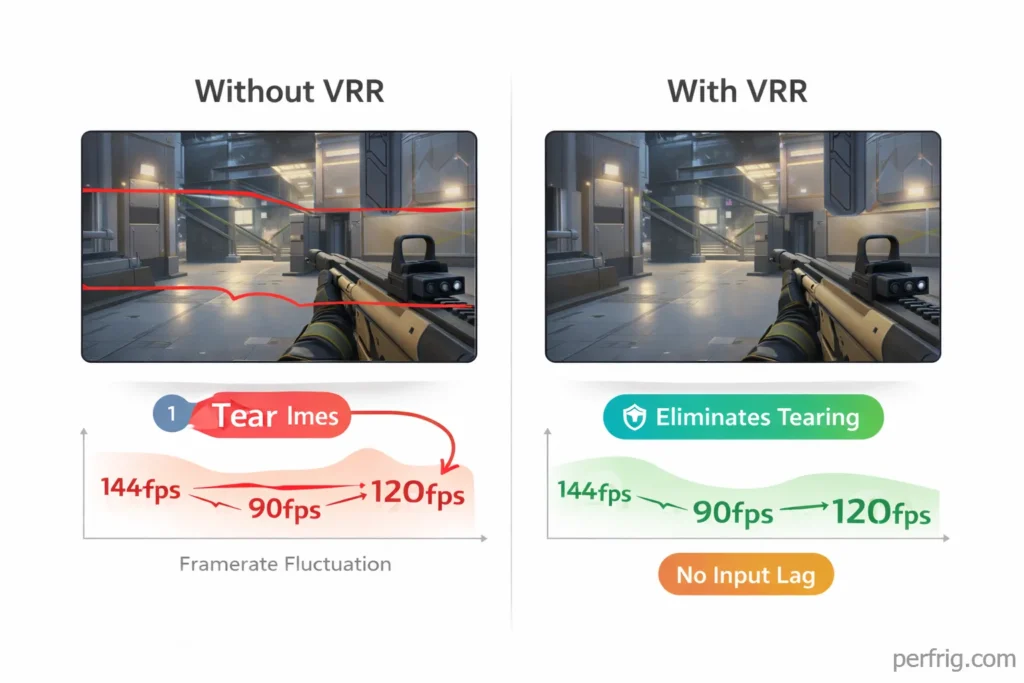
Variable Refresh Rate synchronizes your monitor’s refresh with your GPU’s framerate, eliminating screen tearing without traditional V-Sync’s input lag. Screen tearing occurs when your GPU outputs frames faster than your monitor refreshes, showing parts of two frames simultaneously. Traditional V-Sync eliminates tearing by forcing the GPU to wait, introducing input lag and stuttering when framerates drop.
VRR solves both problems—the monitor refreshes exactly when the GPU finishes each frame. Gameplay feels smoother because frame delivery stays consistent, especially in games where framerates fluctuate significantly.
G-Sync vs FreeSync explained
G-Sync and FreeSync accomplish the same goal but differ in implementation. G-Sync Ultimate uses dedicated hardware modules for the best VRR experience but costs $500+. G-Sync Compatible validates FreeSync monitors that pass NVIDIA’s testing—these cost less but work well.
FreeSync requires no special hardware, making displays cheaper. FreeSync Premium adds low framerate compensation and guarantees 120Hz+ refresh rates. Most FreeSync monitors also work as G-Sync Compatible with NVIDIA GPUs.
The practical advice: NVIDIA users should buy G-Sync Compatible or Ultimate monitors. AMD users should choose FreeSync displays. Don’t worry excessively about tiers—both work well for gaming.
Enabling VRR on NVIDIA GPUs
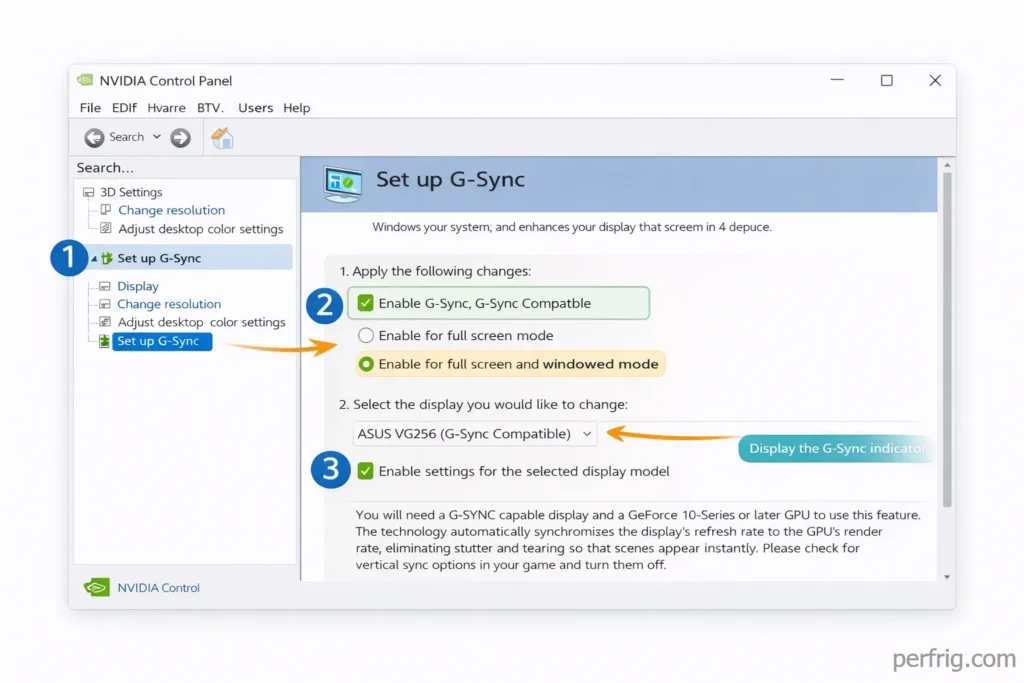
Open NVIDIA Control Panel and navigate to Display, then Set up G-Sync. Check the box for “Enable G-Sync, G-Sync Compatible” at the top. Choose whether to enable it for fullscreen only or fullscreen and windowed mode—fullscreen and windowed mode works better since many games now use borderless windowed by default.
Select your monitor from the list. If multiple monitors are connected but only one supports G-Sync, select that specific display. Enabling G-Sync on non-compatible monitors causes issues. Click Apply after making changes.
Next, open Windows Settings and navigate to Display, then Graphics settings. Ensure Hardware-accelerated GPU scheduling is enabled. This Windows 11 feature reduces latency and improves VRR performance, though it requires compatible GPUs (GTX 1000 series or newer for NVIDIA).
Finally, check your monitor’s on-screen display menu. Many monitors include a specific G-Sync or VRR setting that must be enabled separately from GPU settings. Look for options labeled “G-Sync”, “Adaptive Sync”, “VRR”, or similar. Enable this option, then restart your PC to ensure all settings take effect properly.
Test G-Sync using NVIDIA’s built-in test.
In NVIDIA Control Panel, the G-Sync setup page includes a button to display the G-Sync indicator. Enable this overlay, then launch a game. The indicator shows whether G-Sync is active during gameplay. If it displays “G-Sync On”, you’ve configured everything correctly.
Enabling VRR on AMD GPUs
Open AMD Software: Adrenalin Edition and click Gaming, then Display. Look for AMD FreeSync and toggle it on. AMD’s implementation is simpler than NVIDIA’s, with fewer settings to configure.
Like NVIDIA users, you need to enable VRR in your monitor’s on-screen menu. Press your monitor’s menu button and look for FreeSync, Adaptive Sync, or VRR options. Enable it and save changes.
For optimal performance, enable Enhanced Sync in AMD Software. This feature works alongside FreeSync to eliminate tearing even when framerates exceed your monitor’s maximum refresh rate, which standard FreeSync can’t handle. Navigate to Gaming, then Graphics, and toggle Enhanced Sync.
Test FreeSync by playing a demanding game where framerates fluctuate between 60-120fps. Screen tearing should disappear completely during these variations. If tearing still occurs, double-check that both AMD Software and your monitor’s on-screen menu have VRR enabled—both locations must be activated for the technology to function.
Understanding VRR range and LFC
Every VRR monitor operates within a specific framerate range like 48-144Hz. When framerates fall outside this range, VRR stops working. Low Framerate Compensation (LFC) solves this by doubling or tripling frames when framerates drop below the minimum, maintaining smooth visuals.
Most modern VRR monitors support LFC automatically when the maximum refresh is at least 2.5x the minimum. Check your monitor’s specifications for its VRR range—wider ranges like 48-144Hz work better than narrow ranges like 90-144Hz.
Common VRR issues and solutions
VRR flickers in some games during menus or loading screens where framerates spike. Fix this by setting framerate caps in NVIDIA or AMD software. Always disable in-game V-Sync when using VRR—when both are enabled, they create stuttering worse than neither.
Some monitors don’t properly advertise VRR capabilities. If your FreeSync monitor doesn’t appear in NVIDIA’s list, manually enable G-Sync and test anyway. Windowed mode VRR requires “Enable for windowed and fullscreen mode” in GPU settings.
The bottom line
Enable your monitor’s maximum refresh rate in Windows 11’s display settings—don’t assume it’s active by default. Check both Windows settings and GPU control panels to ensure they match, using DisplayPort cables for refresh rates above 144Hz at resolutions beyond 1080p.
G-Sync and FreeSync eliminate screen tearing without V-Sync’s input lag, providing smoother gaming across framerate fluctuations. Enable VRR in both GPU software and your monitor’s on-screen menu, then disable in-game V-Sync to let VRR work properly. The difference becomes obvious in games where framerates vary between 60-120fps.
If you’re shopping for monitors, prioritize 144Hz over 240Hz unless you maintain 200+ fps consistently in competitive games. Look for wide VRR ranges (48-144Hz or better) and LFC support for the smoothest experience. G-Sync Compatible and FreeSync Premium both work excellently for most gamers without requiring expensive G-Sync Ultimate monitors.
Amed Parker
PC performance and hardware specialist focused on system optimization and component analysis with real world performance testing. I combine hardware knowledge with tuning expertise to deliver stable and efficient results.